Category: Maintenance

  • Kitchen Update No: 1

    Kitchen Update No: 1

    We’re updating our kitchen counter tops to quartz!

    As is seemingly quite normal one new thing tends to lead to a bunch of new things. New counter mean new sink, new faucet and new backslash tiles.

    While the new counter will be installed by the pros I’m tasked with removing the old counter and doing the new tiles. New tiles means removing the old ones. To test out that process I’m starting behind the stove.

    Behind the stove

    No turning back now so I’m hacking off the rest of the tiles trying to minimize the drywall damage.

    Unavoidable drywall damage

    Let the patching begin! Coat #1.

    I suspect there will be a couple of rounds of mudding and sanding to get the surface ready for tiles and then a coat of primer.

  • House Work

    House Work

    I seem to have had some new motivation lately to accomplish a few long outstanding tasks around the house.

    We have 3 basement windows that were never finished when the basement was developed. I just didn’t know how to tackle trimming them out without a lot of messing about. And then, early in the pandemic, I saw and Instagram reel from a finish carpenter essentially building a box with trim attached on one side of the box opposite the window and then you just shove it into the rough window opening. Genius! I made 2 of them and they were a big success. But, for some reason, window #3 got neglected for quite some time. And then the third window finally got it’s trim on.

    Project #1 completed.

    When we finished the basement, many years ago, there was an opening left in the drywall to access the area under the stairs which we, like most people, use for a storage area. Well, the opening was an unusual shape and off and on I’d think about how to finish it off with some kind of door. And then I’d forget about it and a few more years would pass.

    Finally, I decided to build a custom door. I remembered some 1/4” oak plywood in the garage so I build a frame using a Kreg pocket hole jig to fasten the frame together and sheeted if over wth the 1/4” ply and trimmed out all the edges with oak moulding.

    Project #2 completed.

    Again, a door opening in the basement where we had planned to put French doors into just never got completed. Finally, after deciding the French doors were not happening, the opening was painted to match the rest of the basement but it was still exposed 2x4s and the edge of the drywall.

    After buying some very expensive architectural moulding which made the job simpler and some oak trim to match the other basement doors, voila!

    Project #3 completed.

    Last one. Can you figure this one out?

    Well, the wall going downstairs to the basement had quite a few dings, scrapes, scuffs and some patching that never got painted. So, some washing, patching, sanding and a fresh coat of paint has it looking like new.

    I wonder what’s next? Oh yeah, that kitchen reno.

  • The Christmas Wreath

    The Christmas Wreath

    Problem Child

    This is the problem child. He came to our house for Christmas in 2019 and was perfectly well behaved. This year it seems he’s in a “terrible twos” phase.

    Shortly after taking up residence along side our front door we found him down on the ground propped up along side the car!

    The fine wire that I used to hang him up and to be virtually invisible had broken. It seems that in a strong south wind he gets a little excited and flys around banging against the house. Being a little slow, me not him, I re-hung him using the same wire but with a new safety improvement. I attached his power cord to a screw that hold the facia on. This way if he slips off his perch at least he wouldn’t hit the ground, or so I thought.

    The other night both Shirley and I were woken up at 4 a.m. by our problem child banging around in the wind. As I stood at the front window he decided he’d had enough and jumped off the house. Sure enough the safety system worked and he was now dangling around suspended from the edge of the roof. Well, I couldn’t just leave him there so I got dressed and headed out to rescue him.

    However, in the 2-3 minutes it took me to get out there he’d completed his escape and was lying on the ground in the flower bed. Not only that but he took some of his friends with him! A section of aluminium facia was also on the ground with him and about 20′ of Christmas lights were also ripped from the roof and flapping around in the breeze. Well, at 4 a.m. it’s still dark and things couldn’t get much worse so I left him there until after sunrise.

    At 9 a.m. I’m out there with a new plan to rescue the boy. The facia is hammered back into it’s original shape without looking too much the worse for wear and easily re-attached. A new 1/16″ stainless steel cable is used to secure him from above and a 150lb test line is used to secure him from below, hopefully to eliminate the flapping around in a breeze. Christmas lights are re-positioned and everything is re-connected and it seems all good.

    But we’re not done yet! This morning he’s banging around again! Pretty sure he can’t jump off the wall this time but the string holding him down has some slack in it now allowing the flapping around. So, I teach my self the Trucker’s Hitch knot, the gold standard in securing a load and keeping the string tight. So far, so good.

  • Commuter bike repair

    So this week I had a problem with the rear bike rack. On Thursday the bolt attaching the rack to the lower chain stay snapped off. Now the rack is saying on.one side and the fender is rubbing the tire. An quick zip tie fix didn’t make it through the Friday commute. Time for a more serious repair. 

    I pick up a couple of drill bits and a couple of sizes of bolt extractors at Princess Auto.  Step 1, drill out the centre of the bolt. I manage to snap one of two drill bits and I’m a lot more careful with the second bit. Step 2, use the extractor to remove the snapped off bolt. Well, the bolt is stubborn and the extractor snaps off on the drilled out hole. Now this is a real problem. The extractor is hardened steel and the drill bit can’t touch it. Time for Plan B. 

    After some thinking I resort to a little MacGuyver move. 

      
    A 1/2 pipe clamp with a bolt inserted into the band and we’re back in business. 

  • The Septic Field Saga – Part 3

    Part 3 and hopefully the final chapter for another 30+ years.

    After detecting the problem in 2013 and doing the first half in 2014, it’s time to finish of the job.

    Pipes 3 & 4 get dug up and replaced. Scott & Eric were a huge help and made the job go so much faster and it’s always fun working alongside the guys on a project.

    Scott & Eric hard at work on a Lake Project
    Scott & Eric hard at work on a Lake Project

    After the dig & dispose, we made a trip into town for a few pipe parts, and a stop at the Chip Truck.  Once back on the job site the new pipes were assembled,  connected up to the system and then covered over. Repair complete.  Well, almost. The next weekend I re-assembled the walkway to the stairs and sometime this summer we should consider some topsoil and grass seed to put the lawn back in place.

  • The Septic Field Saga – Part 2

    It’s August 2014 now and the problem is back. Apparently the previous years fix was just temporary and now we really need to dig into it, literally, in to it, all of it. “It” is the stuff inside the pipes in the field.

    wpid1849-IMG_3787.jpg
    Fully clogged – A section of pipe at the far end of the field

    There are 4 pipes going out across the field. It’s decided that we could replace 2 while running the operation on the remaining 2, so the digging begins. Step 1 is to remove the walkway which covers the far end of the field. After doing this and digging part of 1 pipe, the weekend is over.

    wpid1851-IMG_3789.jpg
    The first two pipes are fully uncovered.

    On he next weekend Len & Darlene are with us and Len is a good sport and a great help as we uncover the two pipes.

    wpid1853-IMG_3790.jpg
    Full House – Just about clogged solid.

    Here is another example of the extent of the pipe clogging. Within 2-3 feet of the head of the pipe the clogging is about 75% going up rapidly to virtually 100% blocked.

    The following weekend I splice in two new pipes and cover them over.

    wpid1855-IMG_3803.jpg
    Garry splicing in the new pipes.

    That’s a wrap for 2014 and we’ll get to the other two in 2015, preferably with some digging help.

    wpid1857-IMG_3807.jpg


  • The Septic Field Saga – Part 1

    It’s August 2013 and it’s backing up. Never happened before. Another cottage 1st. The “it” is the septic field.

    This is not a good thing.

    The fluid from the rectangular settling tank is not flowing out into the field. This pretty much puts the cottage on high alert as everything that flows into the tank is about to start spilling out all over the yard.

    After probing with a garden host to try an clear any unknown/unseen blockages with out any success,  I decide that we really need to dig into this problem a little deeper.

    Repair Stage #1
    Repair Stage #1

    After digging from the settling tank to the header pipe and across the header a bit I decide to cut out some of the pipe to gain better access to the pipes going out into the field in an attempt to flush them out. In the photo black pipe is the old stuff and white is the new. The flushing seems to be effective so I splice back in the new white pipe and call it a day. Time will prove that this was not the complete answer.

  • Going Old School

    My first stereo system component was a Harman Kardon Rabco ST-7. This is a very sweet linear tracking turntable and for several months it just sat on a shelf as I admired my 1st purchase. At that point I had nothing to hook it up to!

    Well after a couple of decades in retirement, it’s back in service. The main driver for this revival was a gift of Hillsongs Zion on vinyl from Scott and Mandy on my birthday. It hooked effortlessly into my current audio system, and even had a space waiting for it on the shelf.

    IMG_1358.JPG

    However, halfway through the first song, things came to a screeching halt, quite literally. The tone arm mechanism was not tracking properly and trailed the arm is such a way that it pinned it down to the record. Not good.

    Well, after 20+ years of just sitting around, I guess a little maintenance work is to be expected. The ST-7 is notoriously finicky to get set up correctly, but once you’ve got it, its a thing of beauty. After removing the back cover plate it became clear that there was a lot of buildup and “gunk” on the tracking shaft which is instrumental in keeping the arm moving properly across the record. After cleaning that I my attention turned to the small tracking roller that rides on the tracking shaft roller tube. It had similar looking gunk on it. Armed with a Q-tip and alcohol (for cleaning purposes on the Q-tip) I started to clean the roller. A short time into that process and I started to wonder if this was normal, and what is this gunky stuff.

    Google to the rescue. It turns out this “gunk” is what’s left of the silicone ring that is fitted onto the roller. For the ST-7 this is a well known maintenance issue, and from all the descriptions I could locate on the web, very challenging to get the roller out. Once out you can replace the silicone ring with a fairly standard plumbing o-ring from Home Depot. The challenge is getting the roller out and back in without breaking anything or doing a full and complex disassembly. The roller is in a plastic U shaped holder, with very limited access. Apparently surgical tools and surgical skills are a asset in doing this repair.

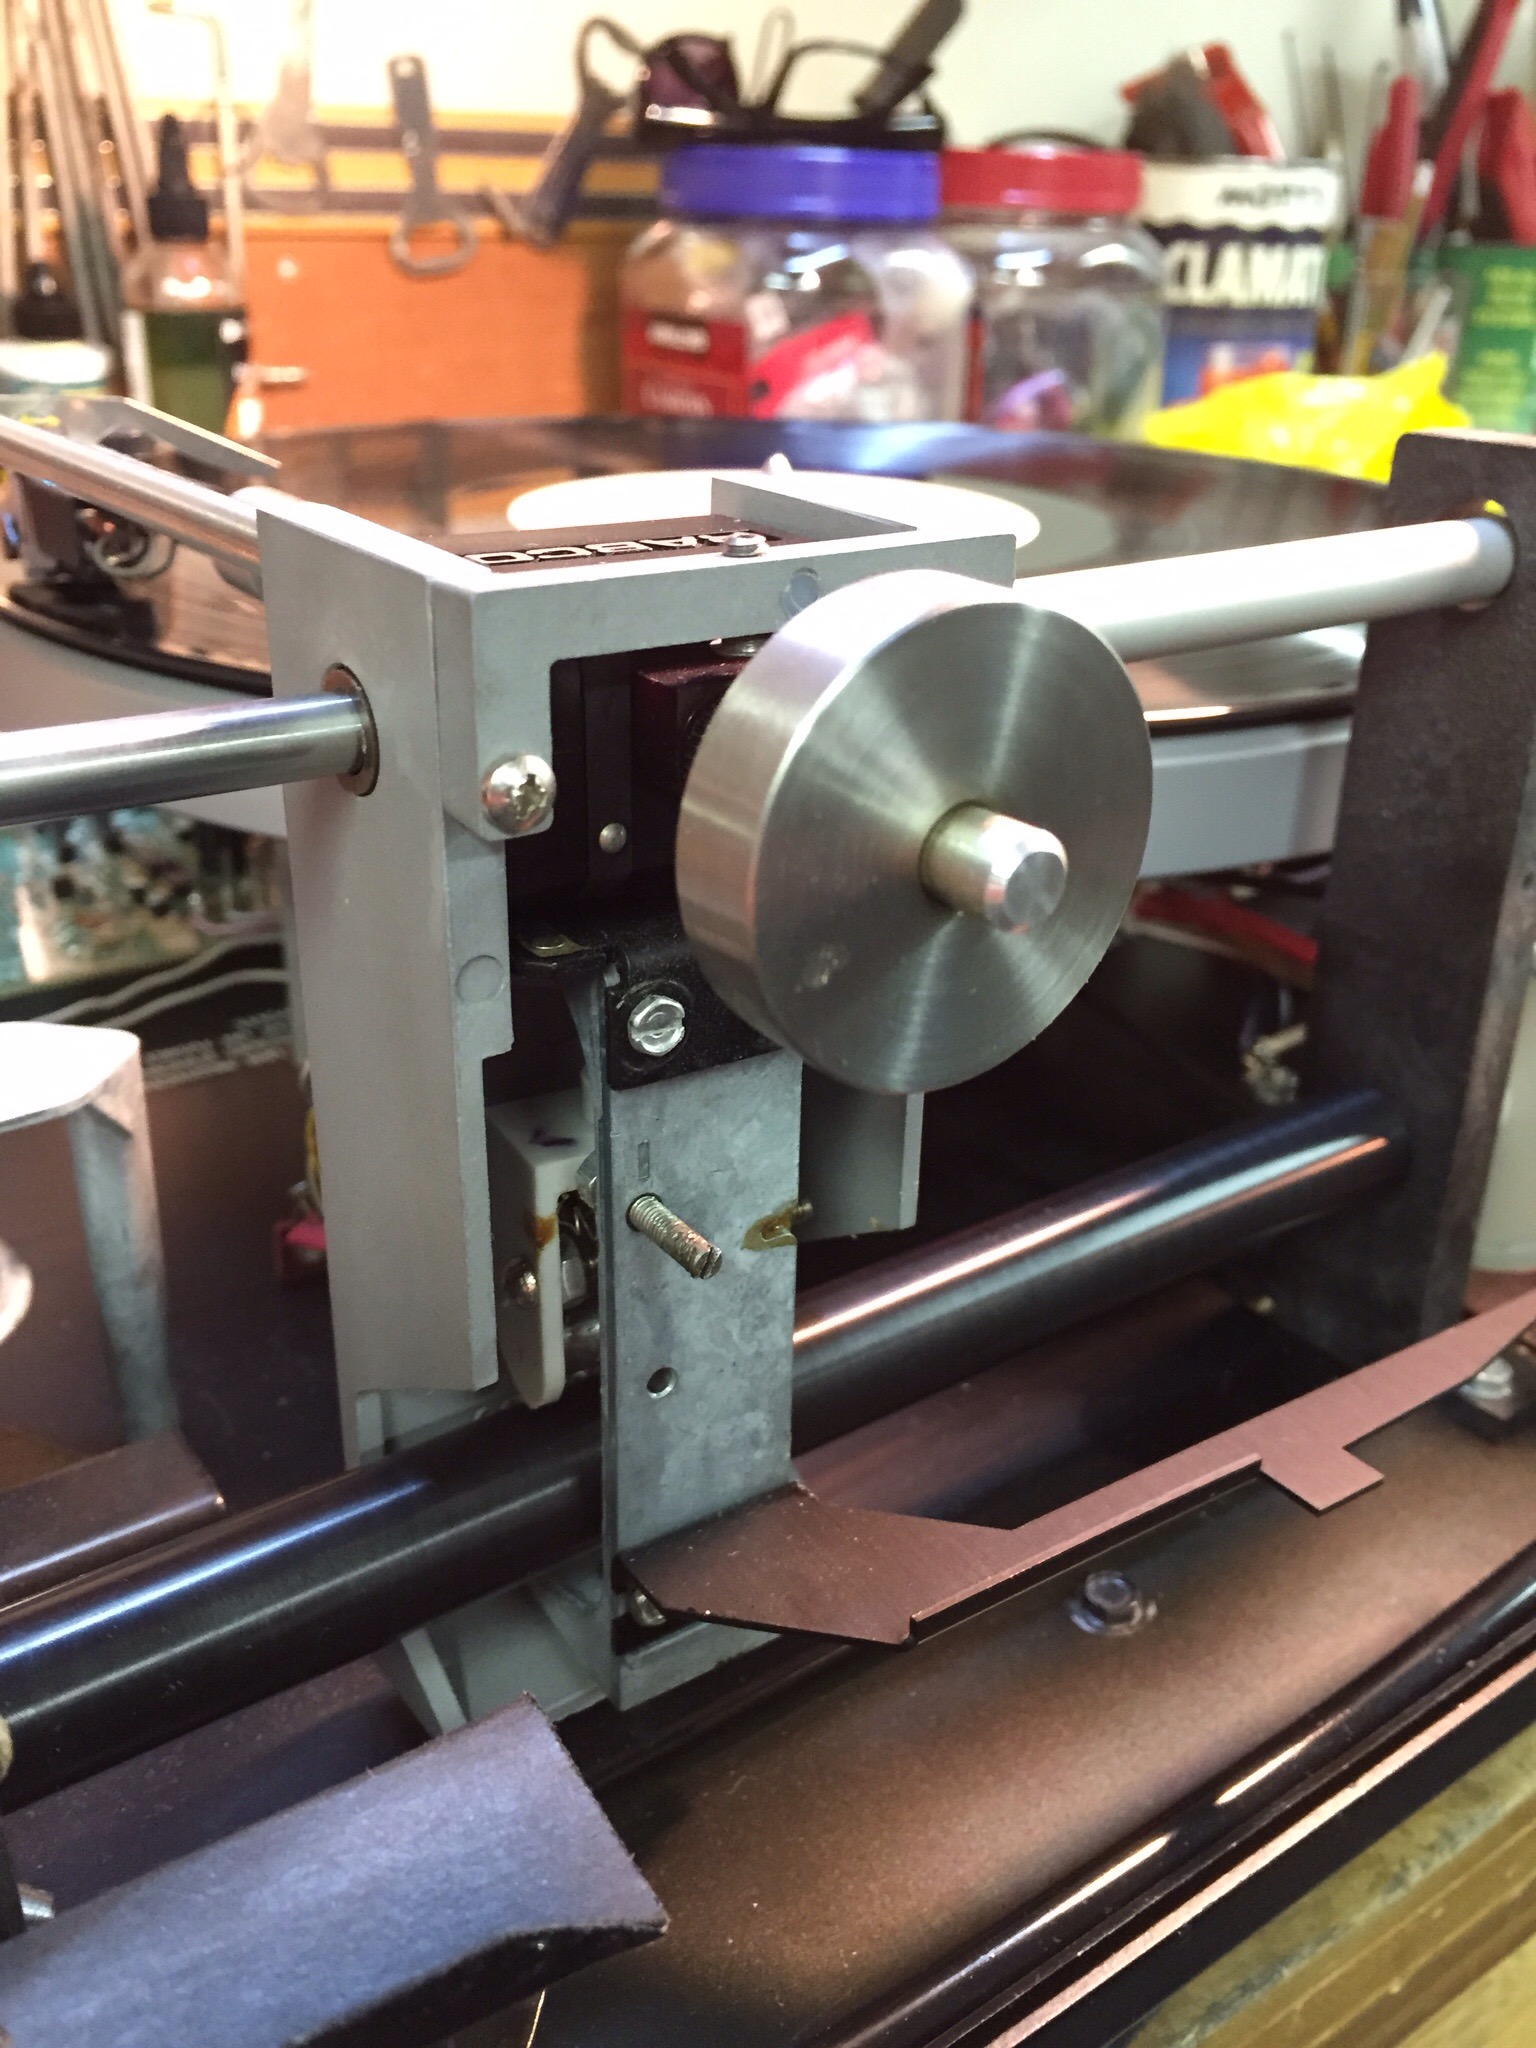
    Perhaps some more disassembly will assist in getting this thing out. Next thing you know my ST-7 looks like this, stripped of all it’s aluminium finery.


    IMG_1360.JPG
    The roller that I need to replace is in here, behind that metal plate with the screw sticking out (Tracking adjuster), cradled in that light grey plastic piece that you can hardly see.
    IMG_1365.JPG

    After quite some time and some careful exploration, the roller is out!

    IMG_1363.JPG

    Apparently, the roller is not symmetrical, some 0.20 mm wider on one end than the other so I get a measure to ensure it goes back in the right way. That brown stuff is like a gummy bear that has melted down and wrapped itself around the roller. Cleaning it up and putting the new o-ring on is easy. Another hour to get the roller back into it’s holder.

    After a few re-assembly goofs, it’s all back together and running. I probably spent another 1-2 hours adjusting the tracking while enjoying some resurrected albums from the storage areas that we’re saved from my collecting days.

    I’m sure there will be a little more vinyl in my listening future.

  • Cottage Tip #1

    As with any cottage of a certain age, there are a number of quirks that have developed over the years. In the beginning, everything is well-organized or at least planned out and then over time little changes accumulate and it helps to have insider knowledge on how things work, or why things got to be the way they are. I’ve occasionally thought of putting together a “Cottage Book”, a history of our cottage, startup and shutdown procedures, things that are likely to go wrong from time to time and how to fix them. Not sure if and when this fabulous book might make an appearance on the best sellers list, so instead I’m thinking a series of “Cottage Tips” might be more expeditious in terms of sharing my experiences.

    Tip #1: The water pump is running, but nobody is using the water.

    This is not a good sign, especially if the pump is running frequently and nobody in the cottage is using any water. This is one reason why we turn the pump off when nobody is there. A runaway water pump will burn out sooner or later, and we’re all kind of used to having water on demand, not to mention the cost of replacing the pump. So, what to do? Well, somewhere in the waterline system there is a leak causing he pressure to drop and therefore the pump to kick in. If the leak is inside the cottage, you probably know this already by the water running all over the place. This generally only happens at startup when the lines have not been drained properly and freezing water has burst a pipe. But what if this is mid-summer and things have been fine up to now? Well, if there is no flooding in the cottage, check the area around the pump. Over the years metal pipes have corroded and cracked causing leaks.

    No leaks here either? Hmmm, more investigation required. The next most likely culprit is the intake line and foot valve. I’d check the foot valve 1st. This little brass valve at the end of the intake line has a little spring-loaded plunger that keeps the water from draining out of the intake line when the pump is not running. When the pump runs, the valve opens and allows the water to enter. The part that is not too visible is the rubber O-ring on the plunger. Over time, it can get cracked and worn out and start leaking. In some cases, it can break and just “disappear” as it did this year (2013). There are spare O-rings in the shop and it’s a simple job to take the foot valve apart and replace the ring.

    First close the valve to the house, just to avoid draining the whole system. Unplug the pump, and drain the pressure off using the hose at the pump. Take the foot valve off the line, remove the plunger, replace the O-ring, re-assemble and re-prime the intake line and plug-in the pump to re-pressurize the line. When the pump stops and the line is fully pressurized, have a look at the foot valve and ensure there is no water spraying out and it’s not making any hissing sounds, which would indicate that it’s still leaking. Assuming all is good, replace the foot valve screen, and take the end of the line back out into the deep water straight out from the dock. Easy eh? Oh yeah, don’t forget to open the valve to the house so you can enjoy the fruits of your labour.

    Not the foot valve? Check the rest of the intake line to the pump, and then check the line between the pump and the house, then look around under the house for leaks. Still can’t find the problem? You have a real mystery on your hands. Keep looking, something will turn up sooner or later.


  • Cooler Day

    First cool (20°) and cloudy day so far this vacation. Up until now it’s been hot & sunny, so a cooler day is welcome. Amazing how you can get lazy and sleep in when it’s not too bright outside. Contemplated a ride this morning, but rolled over for a few more zzzs instead. Caught the last 10km of Stage 8 of the Tour de France over a cup of coffee, followed by some updating of my podcast library, out with the old and in with the new. Always good to have some material on hand for a longer solo bike ride or in the car.

    Yesterday I took care of some miscellaneous maintenance tasks. The water intake line was leaking, so a foot valve repair was in order. Perhaps more on that in a separate post later. The starter button on the  outboard had a “special” way of working, so it got replaced with a new part and now you don’t need to know the secret spot to push it in order to get the thing going. Also, a few more balusters went up on the deck railing. This one will be an ongoing summer project hopefully completed before the fall closeup. Just under 500 to attach to our upper deck. A trip into Kenora for some lumber and miscellaneous stuff, a great dinner & a movie, an evening boat cruise around Scotties and through The Hades rounded out the day.

    This afternoon, if I get out of these PJs any time soon, I’ve been assigned vacuuming duties, and some general cottage tidy-up. I’m likely to work on some more balusters, or perhaps if the intermittent spitting rain seems likely to stop, it’s an afternoon ride as well. Probably all of the above